Saved Views
Saved Views turns your list pages into workspaces you can shape and keep. Filter, group, sort, and pick columns until a list shows exactly what you need, then save it and switch back to it any time.
This page describes what you see when Saved Views is enabled for your organization. If it isn't, your list pages still work with quick filters and sorting that reset when you leave (see What happens when it isn't enabled below).
New here? The Build and save a view playbook walks the whole flow start to finish. Who can see which views is covered in Who can see a view, and common questions live in the Saved Views FAQ.
Where you use it
Saved Views is the engine behind four pages:
- Projects (
/projects) - your projects as a saved-views workspace. - Loads (
/loads) - your loads as a saved-views workspace. (The old/my-loadspage now sends you here.) - Permits (
/permits) - every jurisdiction permit obligation across your loads, as a saved-views workspace. See Permit tracking for what the rows mean. - Views (
/views) - one page that switches across projects, loads, and dispatches, so you can jump between them without leaving the page.
How it works
The rhythm is the same on every page: open a list, shape it, save it, then switch between the views you saved.
- 1
Open a list page
Go to Projects or Loads (or the multi-entity Views page). It opens on the last view you were using. - 2
Shape it
Add filters, group the rows, sort them, and choose which columns show. The list updates as you go. - 3
Save it
When the shape is right, save it as a new view and give it a name. Your view is now one click away. - 4
Switch between views
Use the view switcher (the page title) to jump between your saved views and the ones shared with your team.
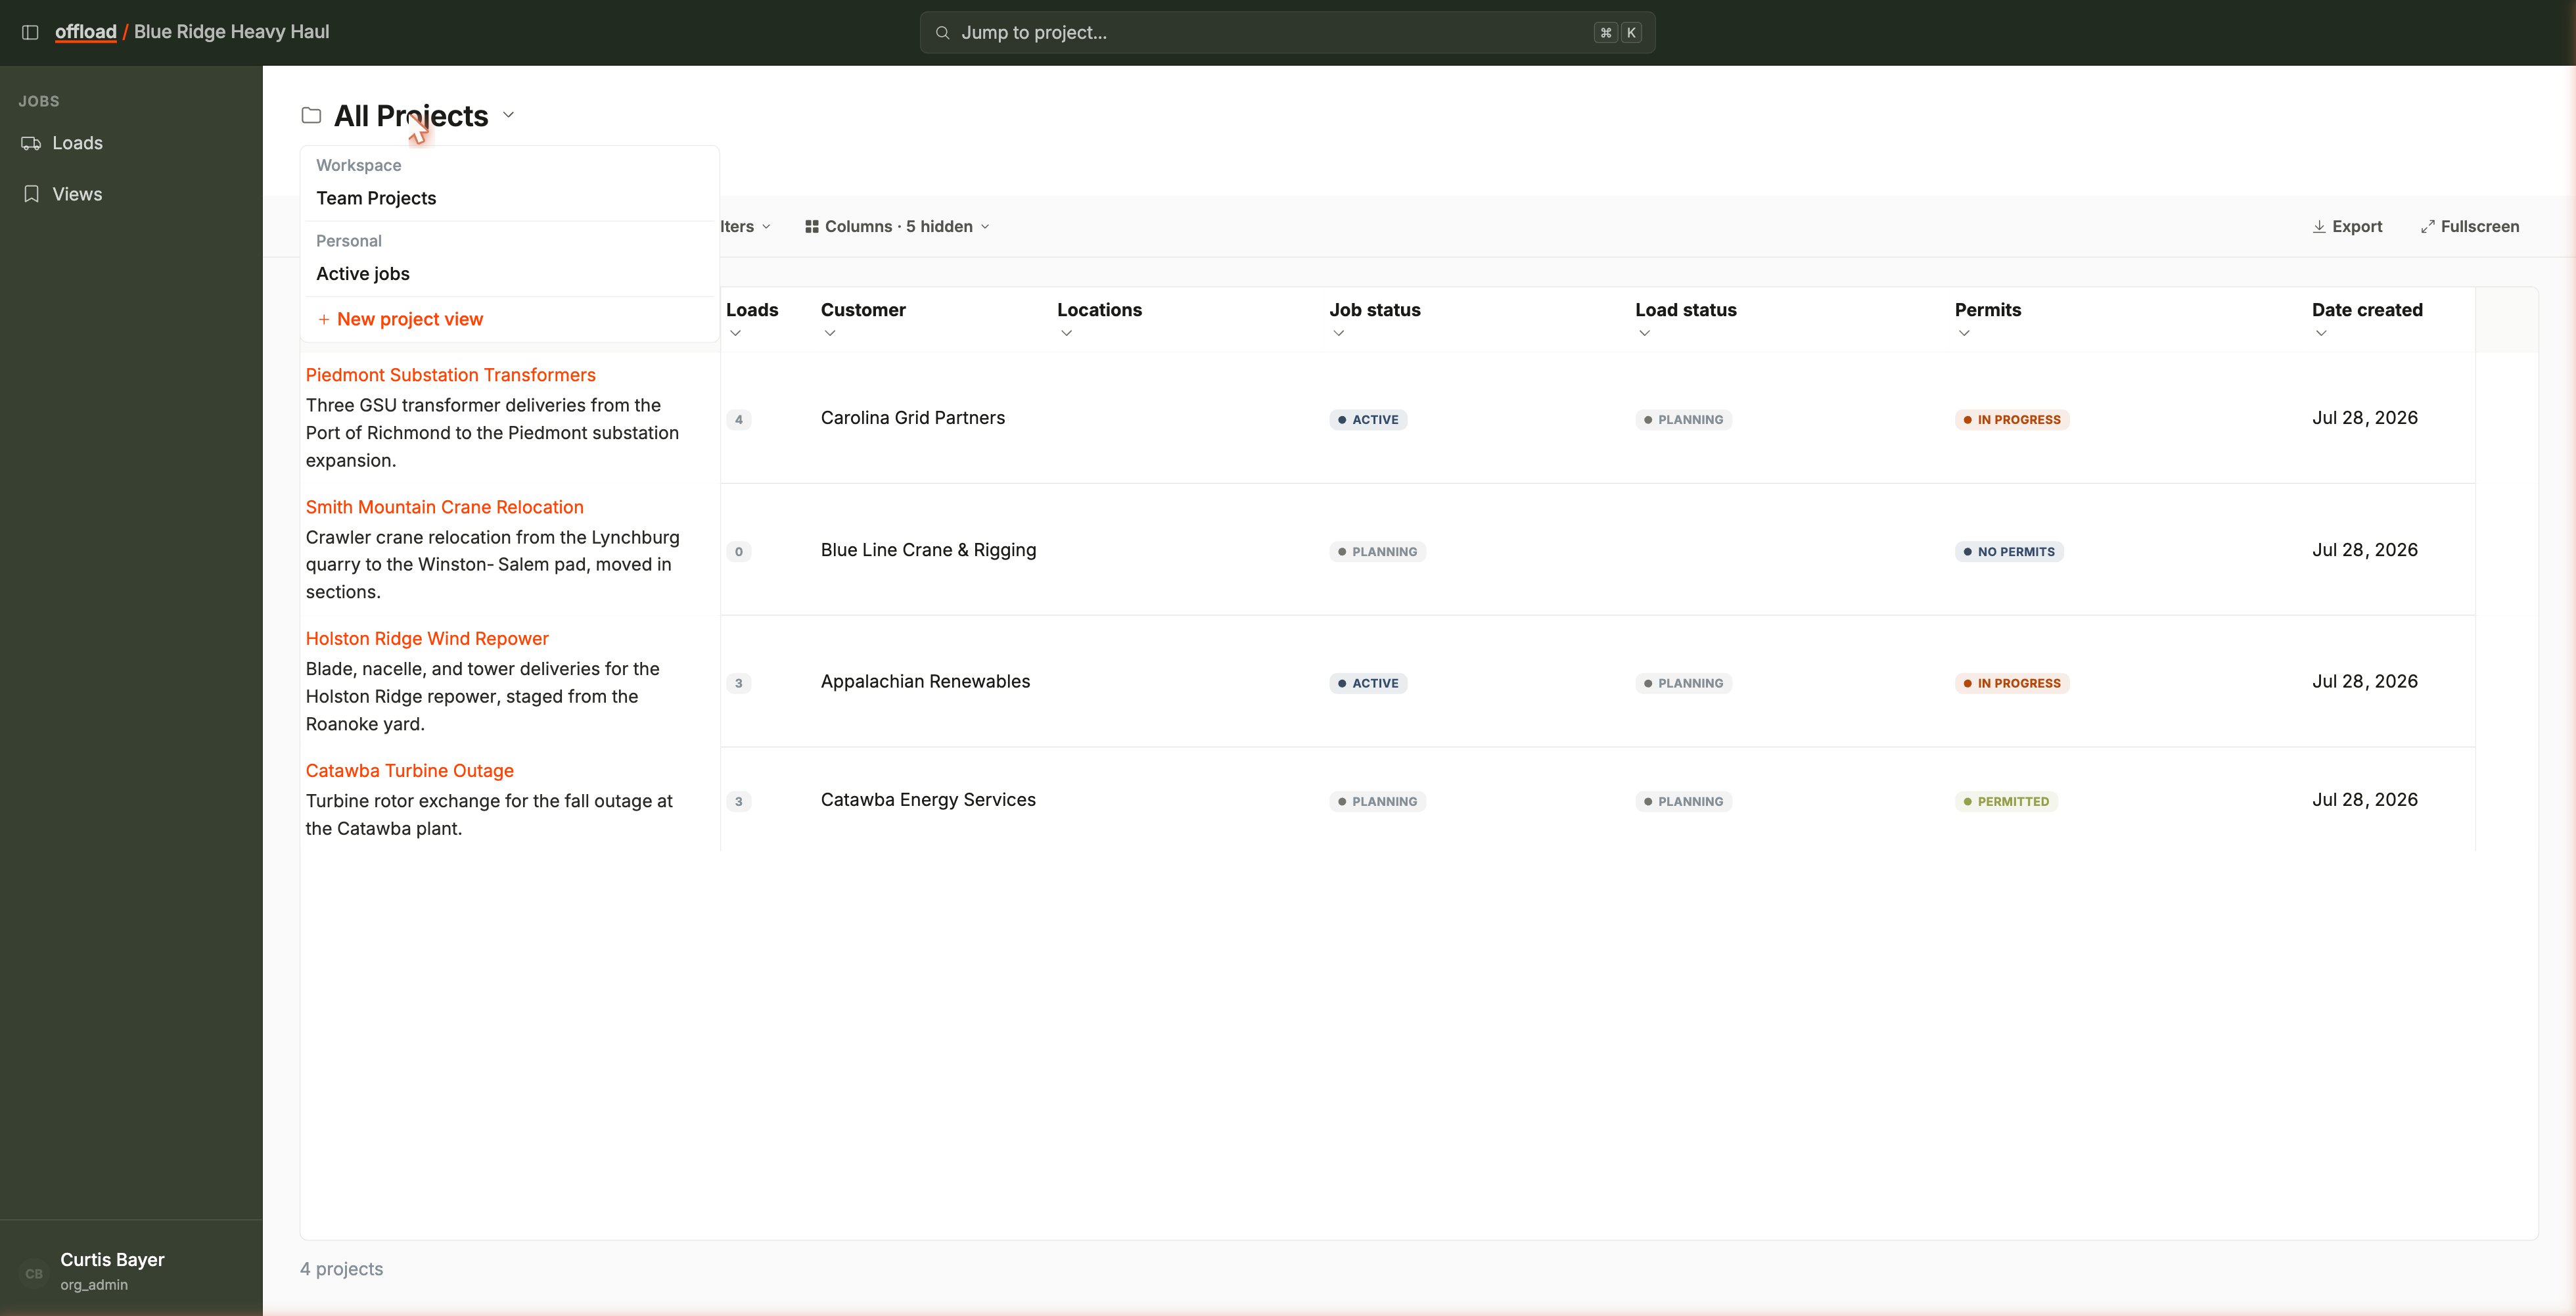
The view switcher
The page title doubles as a menu. Click it to see every view you can open.
- Views are grouped so they're easy to scan. On Projects and Loads they group by tier (Workspace views shared with your organization, then Personal views that are just yours). On the Views page they group by entity (projects, loads, dispatches).
- The view you're looking at has a check next to it.
- An orange dot next to a view means it has unsaved changes (see Saving your work below).
Shaping a list
These are the tools that turn a raw list into a useful view. Mix and match them.
- Filter - narrow the rows with per-field filters: status chips, person pickers, date ranges, and more. Add as many as you need; a row has to match all of them.
- Group - collect rows under headers (by status, customer, and more). Each group header shows how many rows are inside it.
- Sort - order the rows by any column. Click a column header, or use the Sort-by control in the Columns panel.
- Columns - the Columns button opens a panel where you choose which columns show and drag them into order. The first column stays pinned so you never lose the row's identity while scrolling.
- Search - type to find matching rows in the current list.
- Export - download the list to CSV. The export honors the active view, so you get the same filtered rows and columns you see on screen.
- Fullscreen - hide the page header so the list fills the screen.
The row count sits in the footer, so you always know how many rows the current shape matches. Rows also have a menu at the end (right-click works too) with actions like opening the full record.
Saving your work
Change a view's filters, sort, grouping, or columns and Offload notices. An "Unsaved changes" state appears (an amber pill and a dirty-state bar) so you never lose your edits by accident.
From there you have three choices, offered on the split "Save view" button and its menu:
- Save view - update the current view with your changes. (Available when the view is yours to edit; on a teammate's view the cluster leads with Save as new view instead.)
- Save as new view - keep the original as-is and spin your changes into a brand-new view. This opens a details form where you name the view, add optional instructions, and choose its visibility. Choose carefully: a view's visibility can't be changed after saving.
- Discard changes - drop your edits and snap back to the saved version.
Each view also has its own menu (the kebab next to the title): open its instructions, edit its name and details, Duplicate it (including a teammate's view or a starter template), or delete it.
To hand a view to a teammate, send them the page URL with ?view=<id> on the end. They open it read-only: they can use it, but they can't overwrite it unless it's theirs. Full detail in Who can see a view.
Who can see a view
Every view has a visibility tier that decides who can open it:
- Personal - only you see it in your list. (A teammate you send the link to can still open it read-only.)
- Workspace - shared with your whole organization. This option shows up only if you're allowed to author org-shared views.
Each page also ships with built-in default views (like "All loads"). They can't be deleted; duplicate one to make it your own.
For the full breakdown of the tiers, who can create Workspace views, and how it all maps to permissions, see Who can see a view.
What happens when Saved Views isn't enabled
If your organization doesn't have Saved Views, the list pages still work, just without the saving:
- Projects and Loads keep working with quick filter, sort, and search. Those changes are temporary and reset when you leave the page. There's no save button and no view switcher.
- The Views page isn't available.
- The "Views" item is hidden from the left navigation.
To turn Saved Views on for your organization, contact support@letsoffload.com.